Update (08/06/2024): Added Middleware update in settings.py
In the previous post we went through the process of setting up Version Control for our basic-django app.
In today's post, we will take care of Authentication.
Django has authentication built into it. For most cases what Django has to offer is fine, but if you ever want to customize or add to the Auth experience they recommend customizing it. So, that's what we are going to do.
Together we will go through the process of creating a Custom User Model, integrating django-allauth to make out lives easier and to have an option to add social logins in the future, and finally add login, signup, logout logic to our basic-django app.
Note: I'm a strong believer in looking at many sources when it comes to learning. I think it improves understanding of new material. If you agree with me on this, here are some other fantastic Django Authentication posts I encountered, when I was learning:
Users App
Open up your Code Editor (for me it is VS Code) and open your Django project. Confirm everything is working (for example, by running runserver), and let's go.
Let's create a new "app" called users where we will have all the code relating to authentication.
poetry run python manage.py startapp users
Note: If you haven't read the previous post, you might be wondering what is all this "poetry run…" stuff. Well, I like to use Poetry for dependency management. If you want to learn more, see this post.
You should see a new folder was created in your project called users. Awesome.
Now you want to head over to settings.py and add users.apps.UsersConfig to the INSTALLED_APP list. And while we are at it, add the following to the bottom of the settings.py file:
# Authentication
AUTH_USER_MODEL = "users.CustomUser"
This will tell our Django app that we are using a Custom User Model. You might be wondering what is this CustomUser. You would be right, we haven't created it yet and that's what we are going to do now.
Head over to the models.py file under the users folder and add the following code:
 from django.contrib.auth.models import AbstractUser
 from django.db import models

 class CustomUser(AbstractUser):
     first_name = models.CharField(max_length=20, blank=True)
     last_name = models.CharField(max_length=20, blank=True)
     twitter_handle = models.CharField(max_length=20, blank=True)
Here we are creating a model (a table in our future database) that inherits all the fields from the AbstractUser class (that's the built-in model that has fields like username, email, password, etc.), but we are also adding a couple of fields that aren't there. In this example, we are adding "First Name", "Last Name" and "Twitter Handle" fields.
Once you are done setting this up, you can add more stuff, like Date of Birth, Profile Picture, other social links, or anything that your heart desires.
As you can see we named this model CustomUser, which is what we are referring to in the last line of settings.py.
Next, let's add some code that will help us see the new table in our Django Admin panel. Head over to the admin.py file under the users folder and add the following code.
Add the following to users/admin.py:
from django.contrib import admin
from django.contrib.auth.admin import UserAdmin

from .models import CustomUser


class CustomUserAdmin(UserAdmin):
    list_display = ["date_joined", "username", "email", "first_name", "last_name"]
    model = CustomUser

    fieldsets = UserAdmin.fieldsets + (
        (
            "Extra Fields",
            {
                "fields": (
                    "twitter_handle",
                )
            },
        ),
    )


admin.site.register(CustomUser, CustomUserAdmin)
Alright, now we are done with building the Users app. Now let's build the logic for the user signup and login.
django-allauth
Run poetry add django-allauth.
Follow instructions from django-allauth site.
We are not going to do a social authentication, only email, and username, so no need to add 'allauth.socialaccount.providers.{app}', to INSTALLED_APPS.
Here is what the INSTALLED_APPS will look like after new lines:
INSTALLED_APPS = [
    "django.contrib.admin",
    "django.contrib.auth",  # make sure this is present
    "django.contrib.contenttypes",
    "django.contrib.sessions",
    "django.contrib.messages", # make sure this is present
    "django.contrib.staticfiles",
    "django.contrib.sites",
    "allauth",  # new
    "allauth.account",   # new
    ...
]
Don't forget to add the new MIDDLEWARE line like here:
MIDDLEWARE = [
    "django.middleware.security.SecurityMiddleware",
    "django.contrib.sessions.middleware.SessionMiddleware",
    "django.middleware.common.CommonMiddleware",
    "django.middleware.csrf.CsrfViewMiddleware",
    "django.contrib.auth.middleware.AuthenticationMiddleware",
    "django.contrib.messages.middleware.MessageMiddleware",
    "allauth.account.middleware.AccountMiddleware",  # new
    "django.middleware.clickjacking.XFrameOptionsMiddleware",
]
Then, add the following to the bottom of settings.py:
AUTHENTICATION_BACKENDS = [
    'django.contrib.auth.backends.ModelBackend',
    'allauth.account.auth_backends.AuthenticationBackend',
]
SITE_ID = 1

EMAIL_BACKEND = "django.core.mail.backends.console.EmailBackend"

LOGIN_REDIRECT_URL = "home"
ACCOUNT_LOGOUT_REDIRECT_URL = "home"

ACCOUNT_USER_MODEL_USERNAME_FIELD = "username"
ACCOUNT_AUTHENTICATION_METHOD = "username"
ACCOUNT_USERNAME_REQUIRED = True
ACCOUNT_EMAIL_REQUIRED = True
ACCOUNT_UNIQUE_EMAIL = True
ACCOUNT_SESSION_REMEMBER = True
AUTHENTICATION_BACKENDS is required to tell our application to use django-allauth for authentication.
EMAIL_BACKEND will tell our application to use the terminal to "send email" to confirm new signups. You can turn off email confirmation by adding the following line in settings.py:
ACCOUNT_EMAIL_VERIFICATION = "none"
# default is "optinal
# another option is "mandatory"
LOGIN_REDIRECT_URL, and ACCOUNT_LOGOUT_REDIRECT_URL are there to tell Django where to redirect the user after login and logout. Here you can use the values you specify in urls.py. For example, you could use about if your urls.py looked like the code below:
from django.urls import path
from .views import HomeView

urlpatterns = [
 path("", HomeView.as_view(), name="home"),
 path("", AboutView.as_view(), name="about"),
]
But why would you :shrug:
The rest of the lines are pretty self-explanatory. For other django-allauth configurations check out this page.
Database
You should finally be ready to run the migrations and create your database. If you recall we have avoided it in the previous tutorials.
Run poetry run python manage.py makemigrations and then run poetry run python manage.py migrate.
You should see something like this:
➜  basic-django git:(main) ✗ poetry run python manage.py makemigrations
Migrations for 'users':
  users/migrations/0001_initial.py
    - Create model CustomUser
➜  basic-django git:(main) ✗ poetry run python manage.py migrate
Operations to perform:
  Apply all migrations: account, admin, auth, contenttypes, sessions, sites, socialaccount, users
Running migrations:
  Applying contenttypes.0001_initial... OK
  Applying contenttypes.0002_remove_content_type_name... OK
  Applying auth.0001_initial... OK
  Applying auth.0002_alter_permission_name_max_length... OK
  Applying auth.0003_alter_user_email_max_length... OK
  Applying auth.0004_alter_user_username_opts... OK
  Applying auth.0005_alter_user_last_login_null... OK
  Applying auth.0006_require_contenttypes_0002... OK
  Applying auth.0007_alter_validators_add_error_messages... OK
  Applying auth.0008_alter_user_username_max_length... OK
  Applying auth.0009_alter_user_last_name_max_length... OK
  Applying auth.0010_alter_group_name_max_length... OK
  Applying auth.0011_update_proxy_permissions... OK
  Applying auth.0012_alter_user_first_name_max_length... OK
  Applying users.0001_initial... OK
  Applying account.0001_initial... OK
  Applying account.0002_email_max_length... OK
  Applying admin.0001_initial... OK
  Applying admin.0002_logentry_remove_auto_add... OK
  Applying admin.0003_logentry_add_action_flag_choices... OK
  Applying sessions.0001_initial... OK
  Applying sites.0001_initial... OK
  Applying sites.0002_alter_domain_unique... OK
  Applying socialaccount.0001_initial... OK
  Applying socialaccount.0002_token_max_lengths... OK
  Applying socialaccount.0003_extra_data_default_dict... OK
Once this is done we will create a superuser, who would be able to log into the admin panel. Run poetry run python manage.py createsuperuser to create an admin that we can log in with to our admin dashboard. You will be asked for a few prompts:
➜  basic-django git:(main) ✗ poetry run python manage.py createsuperuser
Username: admin
Email address: admin@example.com
Password:
Password (again):
The password is too similar to the username.
This password is too short. It must contain at least 8 characters.
This password is too common.
Bypass password validation and create user anyway? [y/N]: y
Superuser created successfully.
I used username admin and password admin, which is why Django told me that it is bad and I had to overwrite it. This is fine for local development, but certainly not for production. So be mindful of that.
Once the admin user is created run poetry run python manage.py runserver and head over to http://127.0.0.1:8000/admin/ in your browser. Enter credentials you just created. If all is good congrats! If not, let me know.
Now, head over to Sitessection and change it to 127.0.0.1 like so: 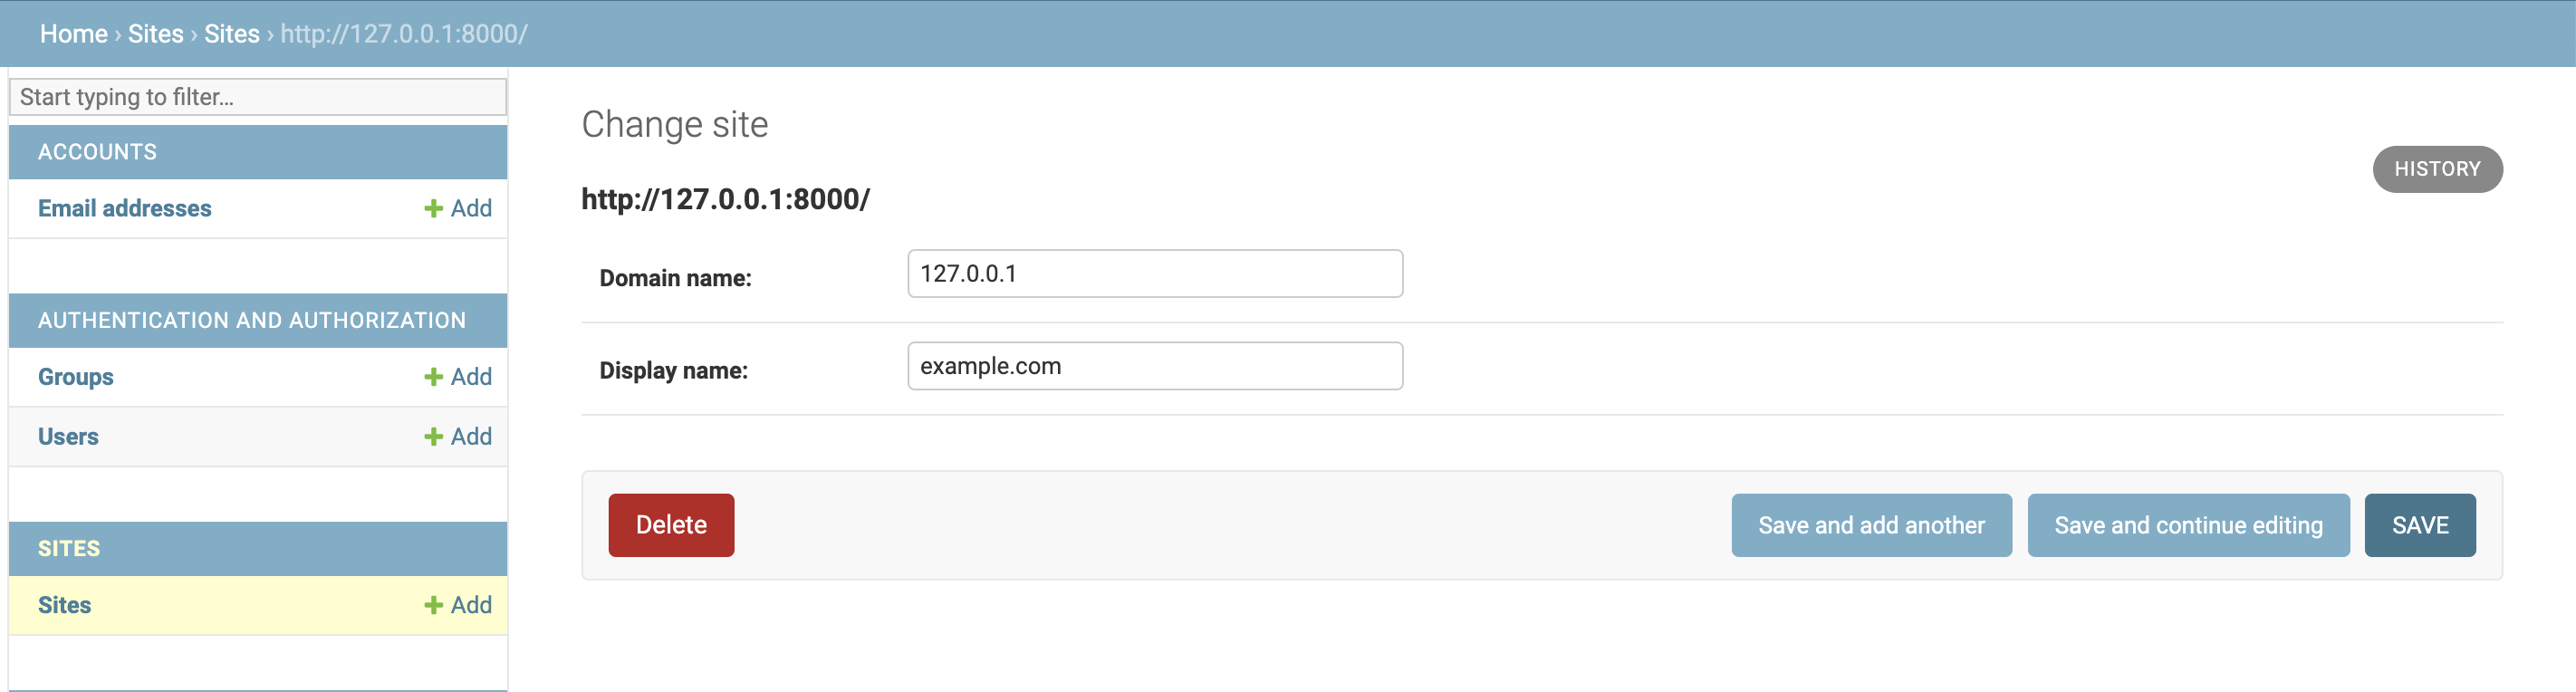
Now, we are done integrating django-allauth into our site. Now we just need to build Sign Up, Login, and Logout screens/logic.
Authentication Screens
django-allauth takes care of signup and login screens for us. They will be very unstyled, but it will work. In future posts, we will focus on styling, but for this one, we will only care about functionality.
Add the following to home.html inside the content block:
  {% if user.is_authenticated %}
    <p>Username: {{user.username}}</p>
    <p>Email: {{user.email}}</p>
    <a href="{% url 'account_logout' %}">Logout</a>
  {% else %}
    <a href="{% url 'account_login' %}">Login</a>
    <a href="{% url 'account_signup' %}">Signup</a>
  {% endif %}
We are telling our template engine to display links to login and signup pages if the user is not authenticated and display the username and email, as well as the logout screen if the user is authenticated.
And you're pretty much done.
If you spin up the server with poetry run python manage.py runserer you'll see new links. Try going to them and creating a user.
In the next post, we are going to integrate TailwindCSS into our app.