Intro
Now that we have set up Tailwind and Authentication (Django-Allauth), let's move to styling those authentication pages.
If you have setup some other authentication setup (not Django-Allauth) you might run into some difficulties, but it still might be useful for you to see.
Code
We are continuing the series where we are working on the basic-django app. The repo for that project can be found here.
In all the previous posts I kind of just added commits to the master, which makes it a little hard to track the progress. From now on, each tutorial will be a separate PR that you can examine to see which code has changed to achieve the desired behavior.
The PR for this tutorial can be found here.
Defaults
If you you were following the previous posts, you should have a bare bone Django application with Authentication. To make sure everything is working lets start the servers.
First, run the npm run start command. Once it works fine, open up a new terminal with Ctrl+N and run poetry run python manage.py runserver. After the Django server started, go to http://127.0.0.1:8000/.
If you are wondering why we are using
npm run startyou should check out the previous post where we installed TailwindCSS. If you have your own way of working with CSS then disregard thenpm run startcommand.
Let's begin by examining the django-allauth repo. More specifically let's look at all the account templates that are available to us.
To be even more specific, let's look at the signup.html file. We can see that it extends the base.html file and has a simple form.
Overwriting Defaults
Inside the templates directory in your project create a new directory called account. Inside that new directory create a signup.html file.
Copy all the text from django-allauth's signup.html file and paste inside your new one.
Since we don't have the exact same environment as django-allauth let's make some changes:
- Replace
{% extends "account/base.html" %}with{% extends "base.html" %} - Remove the
{% load i18n %}line - Remove the
{% block head_title %}{% trans "Signup" %}{% endblock %}line - Replace
<h1>{% trans "Sign Up" %}</h1>with<h1>Sign Up</h1> - Remove the
{% blocktrans %}and{% endblocktrans %} - Finally replace
{% trans "Sign Up" %} »withSign Up
Alright step one is done. We just replicated the simplified default version to our project. The last thing I will ask you to do is to add something silly in that template. For example,
<p>whats aaaaaaaap</p>
This is just to make sure we are overwriting the template. So, if you head to the http://127.0.0.1:8000/users/signup/ page, you should see that silly line there. If you do, awesome, time to move on! If you don't leave a comment with some details and I will try to help you.
Finer Form Control
Now that we can override the let's add some styling. You could stop reading here, since you know how to overwrite the templates, but if you stick around you might learn a couple more useful tips.
First thing I want to draw your attention to is the rendering of the form. As you can see the defaults render the whole form at once with:
{{ form.as_p }}
I don't like to do that since it limits our control of each field. Technically we can control each field by overwriting the form, but who wants to do that. Let's keep all the html in the html file.
So, replace that line with the following:
  {{ form.non_field_errors | safe }}
  <input type="hidden" name="remember" value="true" />
  <div>
    <div>
      {{ form.username.errors | safe }}
      <label for="username" class="sr-only">Username</label>
      {{ form.username }}
    </div>
    <div>
      {{ form.email.errors | safe }}
      <label for="email" class="sr-only">Username</label>
      {{ form.email }}
    </div>
    <div>
      {{ form.password1.errors | safe }}
      <label for="id_password1" class="sr-only">Password</label>
      {{ form.password1 }}
    </div>
    <div>
      {{ form.password2.errors | safe }}
      <label for="password2" class="sr-only">Password</label>
      {{ form.password2 }}
    </div>
  </div>
Here we just explicitly mention all the fields. Since we are doing it ourselves we also have to take care of the errors that will be rendered if users do something wrong (bad password, existing username, etc) and of the labels. If you really wanted you could avoid those, but probably shouldn't 😃
Try reloading the page. If everything works, we can move on to the next step.
Styling Prerequisites
When you render the forms with something like {{ form.password2 }} you will get an input field with some id and name, but no classes.
This makes it hard to style. Sure, you can wrap it in a div and style that. While that will help, some styling choices have to be applied directly to the input tag. So that won't work.
Don't worry, there is a solution to that. The amazing jazzband team is maintaining a cool django extension called django-widget-tweaks (btw, this team maintain a bunch of other cool django extensions). It allows you to control how form fields are rendered inside your html file, rather than in your python file. You will see how in a second.
- Stop your Django Server by heading over to the terminal and pressing Ctrl+C.
- Run
poetry add django-widget-tweaks - Add
"widget_tweaks",to theINSTALLED_APPSlist insettings.py
That's it. We can now start using it immediately.
Head over to the signup.html file and add {% load widget_tweaks %} right after {% extends "base.html" %}. Then, replace all the form renderings like this:
{{ form.username }} becomes {% render_field form.username %}
{{ form.email }} becomes {% render_field form.email %}
etc. Repeat this for password1 and password2 fields.
Alright, to make sure we did everything correctly, let's start the django server and head over to http://127.0.0.1:8000/users/signup/. If all is good move on to the next step. If not, let me know in the comments below, what issue are you running into. Make sure to include as much details as possible.
Styling
Now that we have the everything necessary installed, let's do some styling. Look, I'm not designer, so I'm not going to teach you how to style your pages, that is completely up to you, but here is how I usually do it.
Below is all the code that I added in-between the {% block content %} and {% endblock content %}
<div class="flex items-center justify-center px-4 py-12 my-4 sm:px-6 lg:px-8">
  <div class="w-full max-w-md space-y-8">
      <div>
          <h2 class="mt-6 text-3xl font-extrabold text-center text-gray-900">
              Create your account
          </h2>
          <p class="mt-2 text-sm text-center text-gray-600">
            Or
            <a href="{% url 'account_login' %}" class="font-medium text-green-600 hover:text-green-500">
                login if you have one already.
            </a>
        </p>
      </div>
      <form class="mt-8 space-y-6" id="signup_form" method="post" action="{% url 'account_signup' %}">
        {% csrf_token %}

        {{ form.non_field_errors | safe }}
        <input type="hidden" name="remember" value="true" />
        <div class="-space-y-px rounded-md shadow-sm">
          <div>
            {{ form.username.errors | safe }}
            <label for="username" class="sr-only">Username</label>
            {% render_field form.username placeholder="Username" id="username" name="username" type="text" autocomplete="username" required=True class="relative block w-full px-3 py-2 text-gray-900 placeholder-gray-500 border border-gray-300 rounded-none appearance-none rounded-t-md focus:outline-none focus:ring-indigo-500 focus:border-indigo-500 focus:z-10 sm:text-sm" %}
          </div>
          <div>
            {{ form.email.errors | safe }}
            <label for="email" class="sr-only">Username</label>
            {% render_field form.email id="email" name="email" placeholder="Email" type="email" autocomplete="email" required="True" class="relative block w-full px-3 py-2 text-gray-900 placeholder-gray-500 border border-gray-300 rounded-none appearance-none focus:outline-none focus:ring-indigo-500 focus:border-indigo-500 focus:z-10 sm:text-sm" %}
          </div>
          <div>
            {{ form.password1.errors | safe }}
            <label for="password1" class="sr-only">Password</label>
            {% render_field form.password1 id="password1" name="password1" placeholder="Password" type="password" autocomplete="current-password" required="True" class="relative block w-full px-3 py-2 text-gray-900 placeholder-gray-500 border border-gray-300 rounded-none appearance-none focus:outline-none focus:ring-indigo-500 focus:border-indigo-500 focus:z-10 sm:text-sm" %}
          </div>
          <div>
            {{ form.password2.errors | safe }}
            <label for="password2" class="sr-only">Password</label>
            {% render_field form.password2 id="password2" name="password2" type="password" autocomplete="current-password" required="True" class="relative block w-full px-3 py-2 text-gray-900 placeholder-gray-500 border border-gray-300 rounded-none appearance-none rounded-b-md focus:outline-none focus:ring-indigo-500 focus:border-indigo-500 focus:z-10 sm:text-sm" placeholder="Cofirm Password" %}
          </div>
        </div>

        {% if redirect_field_value %}
        <input type="hidden" name="{{ redirect_field_name }}" value="{{ redirect_field_value }}" />
        {% endif %}

        <div>
            <button type="submit"
                    class="relative flex justify-center w-full px-4 py-2 text-sm font-medium text-white bg-green-600 border border-transparent border-solid rounded-md group hover:bg-green-700 focus:outline-none focus:ring-2 focus:ring-offset-2 focus:ring-green-500">
                <span class="absolute inset-y-0 left-0 flex items-center pl-3">
                    <!-- Heroicon name: solid/lock-closed -->
                    <svg class="w-5 h-5 text-green-500 group-hover:text-green-400"
                          xmlns="http://www.w3.org/2000/svg"
                          viewBox="0 0 20 20"
                          fill="currentColor"
                          aria-hidden="true">
                        <path fill-rule="evenodd"
                              d="M5 9V7a5 5 0 0110 0v2a2 2 0 012 2v5a2 2 0 01-2 2H5a2 2 0 01-2-2v-5a2 2 0 012-2zm8-2v2H7V7a3 3 0 016 0z"
                              clip-rule="evenodd"/>
                    </svg>
                </span>
                Sign up
            </button>
        </div>
      </form>
    </div>
  </div>
This yields something like this:

Feel free to play around with it. A lot of the times, when you paste a large chunk of code from a tutorial you lack some understanding. So, feel free to play around with some values, or change things one at a time to get a better feel for what changes what.
Styling Errors
There is a small problem. The errors that django will display remained unstyled. So, if the user enter a weak password for example, he will see something like this:

Not so nice. We could replace all the error rendering tags to use render_field and add some classes, but that is not such a good idea, since all the errors will use the same styling and we don't want to add a lot of repeating code to our project. That will break the DRY principle of programming.
Don't worry, there is a neat solution. We are going to enhance the Form.
First let's create a generic class that we will be able to use in any part of the application. Inside the basic_django directory (same dir that has settings.py) create a file named utils.py (you can name it whatever you want, but this is the name I use). Here we can store all the code that will can be reused in the whole application.
Add the following to that new file:
from django.forms.utils import ErrorList


class DivErrorList(ErrorList):
    def __str__(self):
        return self.as_divs()

    def as_divs(self):
        if not self:
            return ""
        return f"""
            <div class="p-4 my-4 border border-red-600 border-solid rounded-md bg-red-50">
              <div class="flex">
                <div class="flex-shrink-0">
                  <!-- Heroicon name: solid/x-circle -->
                  <svg class="w-5 h-5 text-red-400" xmlns="http://www.w3.org/2000/svg" viewBox="0 0 20 20" fill="currentColor" aria-hidden="true">
                    <path fill-rule="evenodd" d="M10 18a8 8 0 100-16 8 8 0 000 16zM8.707 7.293a1 1 0 00-1.414 1.414L8.586 10l-1.293 1.293a1 1 0 101.414 1.414L10 11.414l1.293 1.293a1 1 0 001.414-1.414L11.414 10l1.293-1.293a1 1 0 00-1.414-1.414L10 8.586 8.707 7.293z" clip-rule="evenodd" />
                  </svg>
                </div>
                <div class="ml-3 text-sm text-red-700">
                      {''.join(['<p>%s</p>' % e for e in self])}
                </div>
              </div>
            </div>
         """
Here we are creating a class that enhances Django's native ErrorList class by adding some HTML markup to it.
Next, create a forms.py file under the users directory and add the following to it:
from allauth.account.forms import SignupForm
from basic_django.utils import DivErrorList

class CustomSignUpForm(SignupForm):
    def __init__(self, *args, **kwargs):
      super(CustomSignUpForm, self).__init__(*args, **kwargs)
      self.error_class = DivErrorList
As you can see, here we are importing that custom ErrorList class and overwriting the error_class variable available to us in the SignUp Form provided by django_allauth.
One last change we need to make is to tell django_allauth, that we have our own form that we would like it to use. To do that head over to settings.py and add the following line at the bottom of the file:
ACCOUNT_FORMS = {
  'signup': 'users.forms.CustomSignUpForm'
}
Now, let's head back over to the signup page and try entering "password" in the password field and let's see what happens.
What you should be able to see is that something changed, but not exactly to the state that we wanted.

If you look into the DivErrorClass you will see that we have added some other classes to make the text and background red, but that didn't happen. Here is why.
When we were setting up TailwindCSS we created a config file for it. In it there is a block that tells the Twilwind engine in which files you use tailwind:
  content: [
    './templates/**/*.html',
  ],
This is done in an attempt to minimize the generated css file. Let's add another file to it. Add './basic_django/utils.py', to the array to make it look like this:
  content: [
    './templates/**/*.html',
    './basic_django/utils.py',
  ],
Now let's head back to http://127.0.0.1:8000/users/signup/
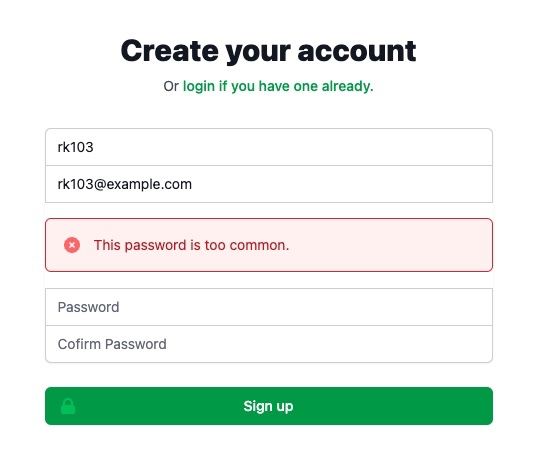
Hooray! Now all the error messages on our website will look like this.
Conclusion
This was a long post, but we have learnt a lot.
We learnt how to overwrite/enhance auth templates provided to us by django-allauth. As well as, how to customize the way error get rendered onto the template.
When I was starting these things were a mystery to me, so I hope they will help you in your journey.
Now the task for you would be to try customizing a different form, perhaps a login or anything else that you might need for your website.