Adding Stimulus.js to Django
Introduction
We are continuing the series of posts for beginners on how to build a SaaS with Django.
In the previous post, we have created our core app and have setup our base models.
Today, we are going to add Stimulus.js into our app. You can see the code changes we made to our basic-django app, here.
I feel like this might be a controversial topic - javascript frameworks. There are a million choices. But for our purposes we need something light, that we can 'sprinkle' on top of our HTML templates.
My favorite choice for this is Stimulus.js. HTMX has been very popular recently, but I'm not too proficient in it (yet), so I don't feel comfortable sharing it with you.
Stimulus has been built by devs at Basecamp, my second favorite group of developers after the team at Readwise.
Stimulus is one part of Basecamp's take on Hotwired Dev (HTML-over-the-wire approach).
Prereqs
In one of our previous tutorials we have installed TailwindCSS into our application via Webpack.
Many would argue, that's this an overkill. While usually I would agree, in this case, I decided to go that route, because I knew we will be installing Stimulus.js via webpack (that is the main and recommended way). So, I decided to install both via Webpack.
Note: this is not a tutorial on all inner working of Stimulus. We will cover how to set it up, and the basic usage. For more info, read their awesome docs.
Let's get to business
This will be very quick and easy, since we did most of the hard work, setting up Webpack previously.
-
Install relevant dependencies:
pnpm add @hotwired/stimulus @hotwired/stimulus-webpack-helpers -
Add the following to your
frontend/src/application/index.jsfile:
import "../styles/index.css";

import { Application } from "@hotwired/stimulus";
import { definitionsFromContext } from "@hotwired/stimulus-webpack-helpers";

const application = Application.start();

const context = require.context("../controllers", true, /\.js$/);
application.load(definitionsFromContext(context));
Here we are initiating our Stimulus app, and loading all our controllers (components) into it, automatically.
-
inside the source directory create a
controllersfolder -
inside that folder create
testing_controller.jsand add the following to it:
import { Controller } from "@hotwired/stimulus";

export default class extends Controller {
    connect() {
      console.log('tesing controller loaded');
    }
}
Here, we are extending the Controller class, and using one of the Lifecycle Callbbacks, that will run every time the controller is connected to the DOM. For testing purposes we are just adding a log statement.
- Now, add the following to our
home.html, anywhere in the file:
<div data-controller="testing"></div>
This will initiate the testing controller.
- let's start our frontend and backend on two separate terminals, to see if everything works:
pnpm run start
poetry run python manage.py runserver
- Open dev tools with F12 and you should see the log message in the Console tab:
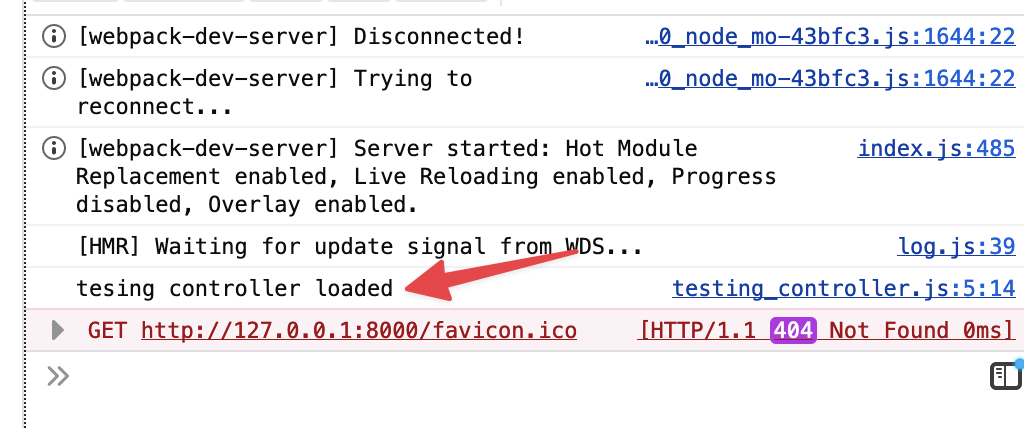
Nice!!!
Addind pre-built components
There is an awesome site, with a bunch of useful Stimulus components, that I covers 90% of needs for me: https://www.stimulus-components.com/
Let's install one of those components from there, for example, this sweet looking Animated Number component.
-
Install this component with
pnpm install @stimulus-components/animated-number -
Add this new component to our
index.jsfile:
import "../styles/index.css";

import { Application } from "@hotwired/stimulus";
import { definitionsFromContext } from "@hotwired/stimulus-webpack-helpers";
import AnimatedNumber from '@stimulus-components/animated-number'; // new

const application = Application.start();

const context = require.context("../controllers", true, /\.js$/);
application.load(definitionsFromContext(context));

application.register('animated-number', AnimatedNumber); // new
- Then let's add the actual component to out
home.htmlfile:
<div
  data-controller="animated-number"
  data-animated-number-start-value="0"
  data-animated-number-end-value="200"
  data-animated-number-duration-value="3000"
>
  0
</div>
- Just in case, let's restart our backend and frontend servers and head over to
http://127.0.0.1:8000/You should see something like this:
The End
Congrats!! Now you have a solid js framework installed. This will come in handy when in the future we need something a little more complex, that plain html files won't be able to handle.
If you have any questions please let me know by emailing me or down in the comments below.